AlmostParenting.com
  • Home
  • About Us
    • Guestbook
  • Site Map
  • Blogs
    • Animal House
    • Crafty Corner
    • Deep Thoughts from the Bus Stop
    • Momoirs
    • NJ Mom's Blog Posts
    • ParenthoodNJ's Picks
  • Education
    • Money Matters - Kids
    • Back to School Guide
    • Preschools, Private Kindergarten & Child Care >
      • Preschool/Day Care Open Houses & Special Events
    • Child Enrichment Programs >
      • Art, Dance & Theatrical Schools >
        • Culinary Creations
      • Art & Painting Fun for Kids
      • Music and Writing
      • Paint Your Own Pottery & Glass Studios
    • Special Needs Children
    • LibraryPrograms >
      • Books for Kids
    • Summer Reading Fun
    • ParenthoodNJ Recommended Reading >
      • Books NJ Kids & Parents Love
      • Book Lists from NJ Libraries
    • Foreign Language Getting Started >
      • Foreign Language Classes
      • Other Foreign Language Resources
      • Foreign Language Groups
      • Foreign Language Books
    • Education Websites >
      • Learning on TV
      • Online & Computer Games
      • Other Techie Learning & Fun
  • Child Care
    • Preschool, Private Kindergarten & Child Care
  • Activities
    • Free Activities in NJ
    • Events Calendar >
      • Memorial Day Parades & Events in New Jersey 2014
      • July 4 Fireworks and Events in New Jersey
      • Halloween 2016 Events in New Jersey
      • Father's Day Fun
      • Other Halloween Fun
    • Winter Holiday Events Listings
    • Winter Holiday Fun Page
    • Annual County Events >
      • Atlantic County Annual Events
      • Bergen County Annual Events
      • Burlington County Annual Events
      • Camden County Annual Events
      • Cape May County Annual Events
      • Cumberland County Annual Events
      • Essex County Annual Events
      • Hudson County Annual Events
      • Hunterdon County Annual Events
      • Mercer County Annual Events
      • Middlesex County Annual Events
      • Monmouth County Annual Events
      • Morris County Annual Events
      • Ocean County Annual Events
      • Passaic County Annual Events
      • Salem County Annual Events
      • Somerset County Annual Events
      • Sussex County Annual Events
      • Union County Annual Events
      • Warren County Annual Events
    • St. Patrick's Day Parades & Events
    • LibraryPrograms
    • Child Enrichment Programs
    • Holiday Gift Guide 2011 >
      • Specialty Toy Stores
      • Plush Toy Review
      • Little Pim Review
    • Holiday/Seasonal Books >
      • Spring Holiday Books
      • Summer Holiday Books >
        • Summer Reading Fun
      • Fall Holiday Books
      • Winter Holiday Books >
        • Oscar the Kitten Review
    • Kid-Friendly Fun >
      • All About the Arts for Kids
      • Animal & Nature Lovers
      • Dinosaurs
      • Jr History Detectives
      • Knights & Dragons
      • Mad About Science
      • Outer Space Page
      • Pirates! Arrr!
      • Superheroes
      • Planes, Trains, Automobiles, Ships
      • Princess and Fairies Page
    • Kids Camps >
      • Camp Tour Dates & Open Houses
      • Summer Camps by theme
    • Other sites for events & activities >
      • Koddler Events New Feed
    • The Great Outdoors >
      • Amusement Parks
      • NJ Spraygrounds & Water Parks
      • NJ Ski areas
      • NJ Farms
      • County Parks in NJ
      • Rec Departments in NJ
      • Beach Towns
    • Zoos, Horseback Riding >
      • Zoos by county
    • Museums
    • For a Rainy Day
    • Sports & Recreation >
      • Indoor Rock Gyms
      • Gymnastics & Yoga
      • Skating Rinks
      • Soccer Programs
      • Swimming Classes
    • Historic Sites & Houses >
      • Revolutionary War History & NJ Sites
    • Theaters & Shows
  • Health & Safety
    • Travel Safety
    • General Health & Safety Resources
    • Safety Lessons for Kids
    • 10th Anniversary of Sept. 11
    • Fire Safety & Planning
    • Hurricane Sandy & Emergency Preparation
    • NJ Safety Resources
    • Warm Weather Safety
    • Winter Weather Safety
    • Swine flu and seasonal flu
    • Allergy Resources
    • Helping Kids in Need >
      • Holiday Fashion Show for Charity
    • Internet Safety
  • Misc Resources
    • ParenthoodNJ Forums
    • Shopping Deals
    • Adoption & Foster Care Resources
    • Pregnancy and Baby Resources
    • Entertainment & Party Planning >
      • Disney Frozen Birthday Party
      • Pirate Birthday Party
      • Superhero Birthday Party
    • Mompreneurs
    • Travel Resources >
      • Car Travel with Kids
      • Flying with children
      • Travel Safety
      • Travel Tourism by state
    • Green living >
      • ParenthoodGreenlist
    • Arthritis Walk
  • Classifieds
  • Child Care and Preschools in New Jersey

St. Patrick's Day Handprint Leprechaun 

3/15/2016

0 Comments

 
Picture
Materials Needed:
  • Tan and orange paint
  • Paint brush or sponge
  • Piece of white paper
  • Pieces of black, green and yellow paper
  • Hole punch
  • Craft Glue stick
  • Scissors
  • Pencil
  • Black marker

This craft was inspired by one of several St. Patrick's Day crafts posted by Elizabeth Lauren Art.

I was not brave enough to try this craft with my 5-year-old son who is not, shall we say, as creatively minded or patient. So I enlisted by 9-year-old daughter to try this out. It can be done with a younger child, with some patience and guidance.
  1. Apply tan paint to the child's palm with a paint brush or sponge and then quickly apply the orange paint to the fingers and base of the palm. You have to move quickly or the paint will dry!! Even then, you may have trouble. The first time we placed her hand on the paper, almost none of the tan "face" appeared and half the fingers looked sparse. So we had to re-apply the paint to her hand and do it a second time. Even then, she had to take a paint brush and fill in the face with tan paint because it looked weird.
  2. Let the paint dry and work on the hat. Use a pencil to draw a rectangle and then a square on top to make the hat. Doesn't have to look pretty as you can flip that side over. Use the scissors to cut out. 
  3. Draw and cut a rectangle out of the black paper. Glue the black rectangle to the green paper hat.
  4. Draw and cut a small square out of the yellow paper. Glue to the black strip on the hat. Use a marker to draw a square to complete the buckle.
  5. For a younger child or less artsy one, have them draw a circle on the black paper for the bottom of your pot of gold and then a rectangle at the top for the lip. The rectangle can even be separate and glued later. Or draw the pot freehand. 
  6. Glue the pot to the bottom of the paper.
  7. Use the hole punch to punch little gold pieces from the yellow paper. Apply your glue to the pot and background paper and then place your "gold" on the glue.
  8. Your leprechaun should be dry by no so you can apply his hat with glue. 

0 Comments

Finger Paint Pot of Gold for St. Patrick's Day

3/15/2016

0 Comments

 
Picture
Materials Needed:
  • Piece of white paper
  • Piece of black paper
  • Glue
  • Scissors
  • Sparkly paint or glitter glue
  • Paint in various colors or Dot Paints
  • Plate or paint palette
  • Pencil (optional)
  • Paper towels for clean up
This idea was inspired by the North Branch Reformed Church Preschool. ​
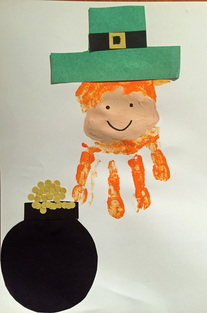
This is a craft that all ages can enjoy. You can use Dot Paints or in our case, my 5-year-old used his fingers, to make a great keepsake.
  1. Use a pencil to draw a U-shape on the black paper from one edge of the paper to the other. 
  2. Take the scissors and cut along the line and you have your lucky pot.
  3. Glue the pot to your white piece of paper with the flat part up.
  4. Pour the first color of paint onto your plate or palette. Dip a finger in, lightly dab on a paper towel before applying to the white paper. (Or if you use Dot Paints, then just dab dots on the paper). You can go in an arc like a rainbow, a zig-zag, a straight line or whatever your child's preference is.
  5. Repeat with the next color and so on until you have used all your colors.
  6. Take glittery paint or glitter glue and spread along the top of your pot to make it shiny.
Picture
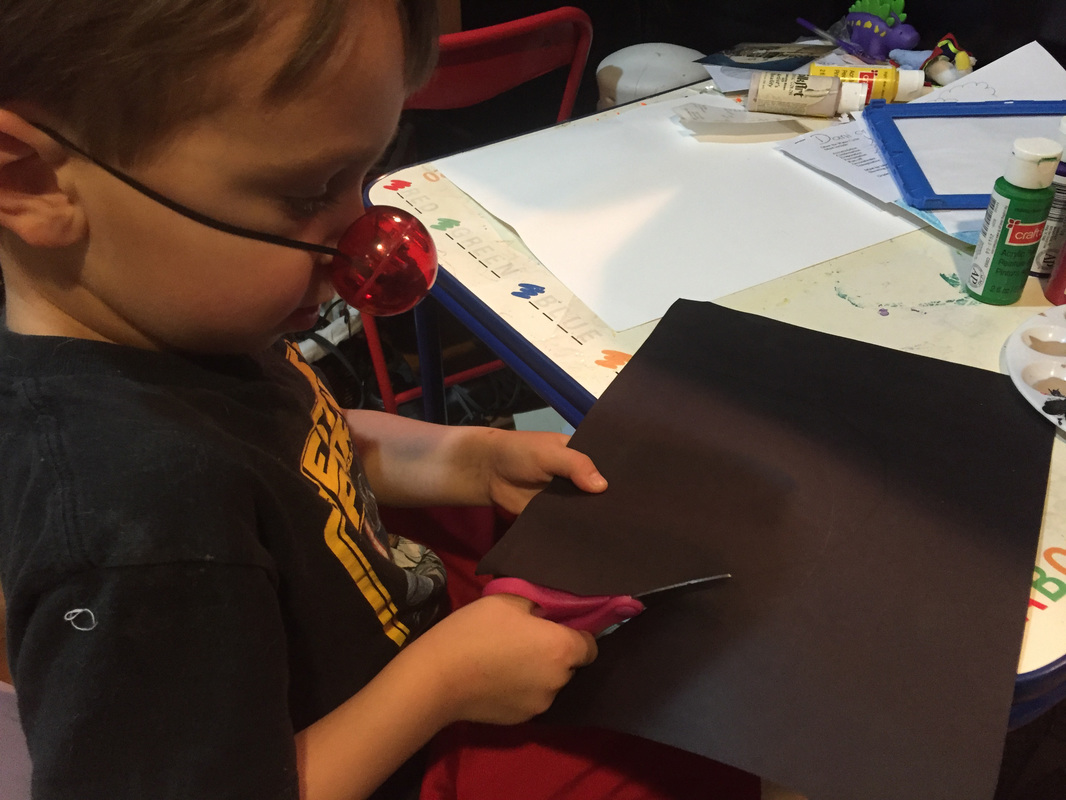
Cutting out the pot, wearing a Rudolph nose - just because.
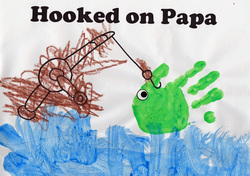
0 Comments

Father's Day "Fishing" Handprint Picture

6/15/2014

0 Comments

 
Picture
Supplies Needed:
  • Piece of paper
  • Blue paint
  • Desired paint color for fish
  • Googly eye, eye sticker or black marker
  • Glue (if using googly eye)
  • Other color paint or crayons
  • Paper plate and sponge (optional)


A wonderful Father's Day craft for all ages. My son's preschool did this craft. I couldn't find the exact template so I made one with a different font for the words. You can download it here.
  1. Print the template on white paper.
  2. Let your child color the fishing pole in crayon, if desired.
  3. I like to use a paper plate and cheap sponge (can get a pack at the dollar store) for making handprints. I find it makes it a lot easier. So if you use my method, pour some paint on a paper plate. Take the sponge and blot it on the paint. Wipe off any globs. Then dab your child's hand with the sponge.
  4. Have your child place their painted hand on the paper. You might need to help them.
  5. I would let the handprint dry and then let your child finger paint the blue along the bottom for the ocean.
  6. When the fish is dry you can glue on a googly eye, draw one or use an "eye" sticker.


Here are alternatives for this craft that you can do as well:
  • I'm Hooked on Daddy - You can easily use a black marker to draw the line and fish hook and write (or have your child write) "I'm hooked on Daddy.
  • I'm Hooked on Daddy (no paint) - very similar to the other one except you use construction paper for the handprint
  • Hooked on Papa - This one uses a footprint for the fishing pole and the handprint for the fish

0 Comments

Father's Day Rocket Ship Craft

6/12/2014

0 Comments

 
Picture
Supplies Needed:
  • Black construction paper
  • Colored paper - orange, red and whatever color preferred
  • Piece of white paper
  • Colored star stickers
  • Self-Adhesive gems or other stickers
  • Small photo of child's face
  • Pencil
  • Glue stick
  • Tape
  • Scissors
  • White crayon

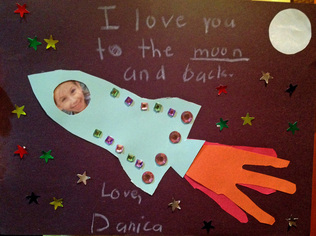
This is a great Father's Day craft that kids of all ages will enjoy. Younger kids will need more assistance but they can do it. This craft was inspired by the rocket craft from All Kids Network. 

1. Print out the template from All Kids Network and cut out (or have your child cut) the rocket ship and moon. I would have an adult cut the circle in the rocket to accommodate the photo.
2. Trace your child's hand (older kids can do this themselves) - one hand on orange paper and one hand on red paper. Then cut them out.
3. If you don't already have a photo on hand, then print one out.
4. Cut the photo to the proper size and tape it in position to the back of the rocket. 
5. Have your child position the hands the way they want to look like flames. You may want to cut off the thumb at least, if not the thumb and pinky, to make it look right. 
You can tape the flames to the back of the rocket and then glue the whole thing to the paper but it seemed unwieldy for my younger child. We found it easiest to position the rocket and flames where you want and then glue the flames in place on the paper and then glue the rocket. 
6. Have your child write a message. In my 3 1/2-year old son's case, we shortened the message from "I Love you to the moon and back" to "I (heart) you" with a heart sticker because he can't write very well - see picture below.
7. Glue the moon. Place the star stickers where desired.
8. Decorate the rocket. My kids both chose self-adhesive gems but you can use any kind of foam or regular stickers or even draw a design. With my preschool-age son, we used the larger gems because they were easier for him to handle and place on the rocket all by himself. My elementary-school daughter had the dexterity to use the tiny gems.
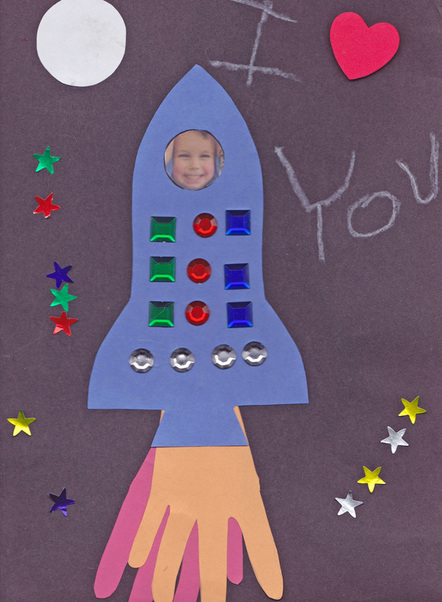
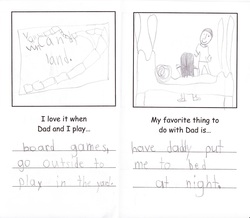
Picture
0 Comments

Father's Day - Daddy & I Book

6/9/2014

0 Comments

 
Picture
Supplies Needed:
  • Paper
  • Printer
  • Stapler or hole punch and string
  • Crayons
  • Pencil or pen
  • Scissors

This is probably best for school-age kids to do for Father's Day or even for Daddy's birthday. My daughter did this in school but you can find the template to make your own from All Kids Network here. They had instructions for using string to hold the book together but you can also staple it. 
Note: If you're more experienced with computers and printers you can double-side print pages 3-4 and 5-6. And swap pages 1-2 (using a photo editing program is easiest) and then you're down to two pages for the book and no cutting and string necessary. However, if your child uses markers then the images will bleed through.

Print the three template pages from All Kids Network and let your child draw and write what they're thinking. You might end up with some funny ones. Depending on your child's attention span, you might want to break this project up into mini sessions.
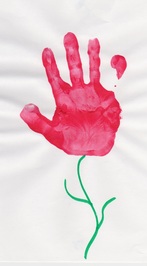

0 Comments

Mother's Day Handprint Flower

5/7/2014

0 Comments

 
Picture
Supplies Needed:
  • Paint of desired color
  • Green marker
  • White paper 
  • Paper plate and sponge (optional)


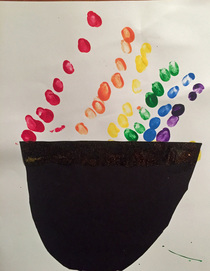
This is one of the easiest crafts we've ever done and makes a wonderful keepsake. I find using a sponge and paper plate for handprints is easiest but you don't have to do it that way.

1. Pour some paint on a paper plate and then dab the paint with a sponge (I get them at the dollar store).
2. Wipe off globs so you have an even covering on the sponge. Then blot the sponge on your child's hand. Or flip the sponge over on the plate (where there is no paint) and have your child place their hand on the sponge.
3. Have your child place their painted hand on the paper. (For younger children, you will need to guide them).
4. Then use the marker to draw a stem and, if desired, leaves.
5. Let dry. Then you have the perfect gift.
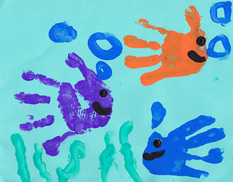
0 Comments

Handprint Fish

1/2/2014

0 Comments

 
Picture
Materials Needed:
  • Various colors of paint
  • Paper plates
  • A sponge or paint brush (you can get cheap ones at the dollar store)
  • Colored paper
  • Lots of soap & water for clean up!

This is a great keepsake craft to give as a gift for Father's Day or a birthday or just because. There are other ways to apply handprints with paint but this is the way I prefer for slightly less mess.

1.
Take first color of paint and put it on a paper plate. Use a paint brush or a sponge to apply the paint to your child's hand. Don't put too much on - just enough to cover the hand.
2. Help your child place their hand on the paper sideways.
3. Repeat with another color. (If you have more than one child, have each one do a handprint)

4. When all your fish are applied. Use your child's finger to make the bubbles, seaweed and eyes and mouths.

I almost always have left over paint after a craft like this. Instead of just tossing it, I let my kids mash their hands in the remaining paint to make their own crazy paintings (they often mix the colors together).  Their work is not usually frame-worthy but
they have fun and I feel less guilty about tossing the paint.
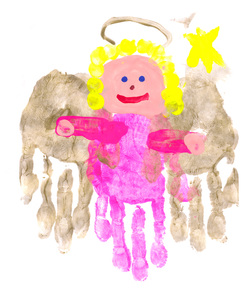

0 Comments

Hand Print Angel

12/10/2011

0 Comments

 
Picture
Items Needed:
* Piece of paper or card stock (white is best) - you might need a few pieces
* Craft paint (gold for wings and halo, other colors optional)
* Sponges (get a bunch from a Dollar Store)
* Paper Plates
* Paintbrush
* A few disposable rags or lots of paper towels

Note: I did this craft with my 5-year-old which I think is the ideal minimum age. If you try this with a younger child, I would recommend at least two adults help with this craft.

This craft, based on a project in The Usborne Big Book of Playtime Activities, can be messy and a little time consuming but it is worth the effort and makes a great keepsake.

1. Start with the "body" of the angel and apply your paint color to a paper plate. My daughter chose pink.
2. Rub the sponge on the plate and wipe off some excess and then place your child's hand on the sponge to apply the paint to his or her hand (this is like having a large ink pad).
3. Firmly place your child's painted hand in the center of the paper. If you don't get it right the first time, try again with a new piece.
4. Let the "body" dry for a few minutes; take this time to wipe off the excess paint.
(Note: You could do the wings first to prevent multiple hand cleanings, but you'd have to be pretty certain of your hand placements).
5. Assuming you've done the body hand print first, now apply your gold paint to another plate. Spread a sponge on the gold paint (You could use the other side of the first sponge but you will get very messy. For a cleaner option, rinse the first sponge or just use a new sponge for this color).
6. Press your child's hand onto the gold-painted sponge. Wipe off any excess and firmly apply the hand to the paper, slightly overlapping your "body" hand print.
7. Then apply your child's other hand to the gold-painted sponge (you may need to add some paint to the sponge). Press this hand to the other side of the "body."
8. Allow the paint to dry a little and wipe your child's hands off.
9. Rotate the paper so the fingers are pointed down.
10. Use a pale pink or cream paint (or whatever skin tone you'd prefer) and have your child finger paint a circle for the head and two finger prints for the hands. For younger kids, you can help guide them.
11. Dip your child's finger in whatever paint color you've chosen for the hair color and apply the hair around the head in a dot pattern.
12. Draw a face with your choice of colors for the eyes, nose and mouth. (A paintbrush might be best here and an adult might be needed for this part).
12. Use the gold paint and draw a halo. Small kids can use their finger or a paintbrush.
13. You can embellish the picture with other decorations such as stars which can be drawn with the finger or a paintbrush.
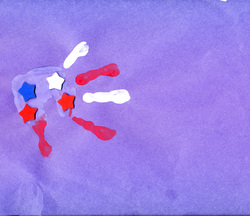
0 Comments

Fourth of July Flag

6/9/2011

0 Comments

 
Picture
Materials Needed
* sheet of construction paper
* red, white and blue paint
* glue
* wooden stick
* optional - star stickers

1. Take a sponge or paint brush and apply different colors to your child's fingers and palm
2. Then help your child place their hand on the paper
3. When the paint is dry, apply the stickers and glue the wooden stick to the paper
4. Your flag is now complete and you have a personalized memento.

Idea from the Middlesex Borough Recreation Department

0 Comments

Handprint Keepsake Ornament

12/23/2010

0 Comments

 
Picture
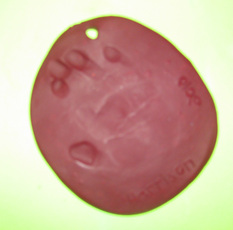
Items Needed* Clay that can be baked (color optional; amount depends on the size of the hand) - note alternate materials below
* Baking pan
* Tin foil
* Clay knife or similar utensil
* Rolling pin for clay
* Depending on your child's age, an additional adult can be helpful
* Ribbon if you want it to be an ornament
* Access to an oven

It's not terribly expensive to buy a hand print ornament kit  (the average price is $10), but you can do it for a fraction of the cost on your own, especially if you want to make more than one. In addition to making a hand print ornament as a gift for the grandparents (great for your baby's first Christmas) you can make your own hand print keepsakes inexpensively as your child grows.

Knead the clay and then roll it out onto your pan. I've done this several times so I actually have an old baking pan I use specifically for baking clay items. If you don't have a pan like that, then line it with tin foil and place your clay to be baked on top of that.

Roll the clay out to about 1/4 inch thick or so. You can make it a little thicker if in doubt. Roll out enough to have space around your child's hand. Sometimes if you flip it over the underside is smoother looking. Then have your child place - or help them place - their hand roughly in the center of the clay and push down. If the child is 3 or younger, you'll want to try and hold their hand down for a few seconds and gently push each digit into the clay just to be sure you get a full impression (of course your child's age, squirm factor and general attitude will play a large part). Then try to pull your child's hand straight out (note some younger kids will instinctively curl their fingers so pulling the hand back quickly helps avoid this).

If you don't like the impression, pull it off the pan, roll it into a ball and re-roll it for another try. If you do like it, then cut away any excess clay with the knife to make it a circular or oval shape. You can also use a clay tool or even a push pin to carve your child's name and/or the year. Also use the knife or clay tool to cut a small hole in the top for your ribbon later.

Cook it in your oven to the temp and time frame recommended on the clay package. Once it's cooled, tie your ribbon.

For an extra creative boost, wrap your gift in hand print paper.

Other tips and ideas:
* If you want to have keepsakes of your child's growth, buy the air-dry or baking clay in different colors and you can do their hand and foot prints at different milestones - 3 months, 6 months, 9 months, 1 year and so on. At the two-year mark, I did my daughter's hand impression for that milestone, 2 1/2 and 3 years and then switched to paint hand prints as they're easier to store.
* If you use the air-dry or baking clay in colors instead of plain white, then buy at least two packs per color. I liked using a different color for each milestone (ie blue for 3 months, then green for 6 months) and as your child grows, you will need at least 2 packets (if that's how you buy the clay) for one hand or foot. You can buy white in a big box but be sure to put the excess in a zip lock bag or it could dry out before you're ready to use it again.
* You can get a shadow box to display the prints or just keep them in a nice decorative box. You can also mount them on a wall or place on a decorative shelf.


Read More
0 Comments
<<Previous

    Categories

    All
    Alphabet Fun
    Birthday Party
    Ceramic
    Christmas
    Clay
    Craft Book Review
    Crafty Gifts
    Crayon
    Easter
    Edible Crafts
    Father's Day
    Fourth Of July
    Halloween
    Handprint Craft
    Hanukkah
    Holidays
    Inexpensive
    Keepsake
    Mother's Day
    Paint
    Pretend Play
    Princes & Knights
    Princess
    Rainy Day
    Recycling Crafts
    Spring
    St Patricks Day
    Summer
    Valentines Day
    Winter

    Archives

    March 2018
    March 2016
    December 2015
    June 2015
    April 2015
    March 2015
    February 2015
    June 2014
    May 2014
    April 2014
    March 2014
    January 2014
    December 2013
    September 2013
    October 2012
    January 2012
    December 2011
    October 2011
    June 2011
    March 2011
    February 2011
    January 2011
    December 2010
    June 2010
    October 2009
    July 2009
    June 2009

    Author

    Sandra K. Lee is a freelance writer and stay-at-home mom with a 8-year-old princess & a 4-year-old superhero in Middlesex County, New Jersey.

    She also writes Momoirs and other blogs at NJ.com and the NJ Moms Blog.

    Picture

    RSS Feed

Powered by Create your own unique website with customizable templates.