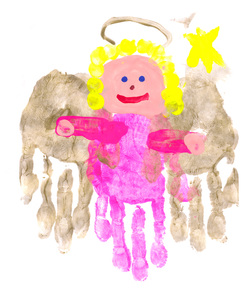
 Items Needed: * Piece of paper or card stock (white is best) - you might need a few pieces * Craft paint (gold for wings and halo, other colors optional) * Sponges (get a bunch from a Dollar Store) * Paper Plates * Paintbrush * A few disposable rags or lots of paper towels Note: I did this craft with my 5-year-old which I think is the ideal minimum age. If you try this with a younger child, I would recommend at least two adults help with this craft. This craft, based on a project in The Usborne Big Book of Playtime Activities, can be messy and a little time consuming but it is worth the effort and makes a great keepsake. 1. Start with the "body" of the angel and apply your paint color to a paper plate. My daughter chose pink. 2. Rub the sponge on the plate and wipe off some excess and then place your child's hand on the sponge to apply the paint to his or her hand (this is like having a large ink pad). 3. Firmly place your child's painted hand in the center of the paper. If you don't get it right the first time, try again with a new piece. 4. Let the "body" dry for a few minutes; take this time to wipe off the excess paint. (Note: You could do the wings first to prevent multiple hand cleanings, but you'd have to be pretty certain of your hand placements). 5. Assuming you've done the body hand print first, now apply your gold paint to another plate. Spread a sponge on the gold paint (You could use the other side of the first sponge but you will get very messy. For a cleaner option, rinse the first sponge or just use a new sponge for this color). 6. Press your child's hand onto the gold-painted sponge. Wipe off any excess and firmly apply the hand to the paper, slightly overlapping your "body" hand print. 7. Then apply your child's other hand to the gold-painted sponge (you may need to add some paint to the sponge). Press this hand to the other side of the "body." 8. Allow the paint to dry a little and wipe your child's hands off. 9. Rotate the paper so the fingers are pointed down. 10. Use a pale pink or cream paint (or whatever skin tone you'd prefer) and have your child finger paint a circle for the head and two finger prints for the hands. For younger kids, you can help guide them. 11. Dip your child's finger in whatever paint color you've chosen for the hair color and apply the hair around the head in a dot pattern. 12. Draw a face with your choice of colors for the eyes, nose and mouth. (A paintbrush might be best here and an adult might be needed for this part). 12. Use the gold paint and draw a halo. Small kids can use their finger or a paintbrush. 13. You can embellish the picture with other decorations such as stars which can be drawn with the finger or a paintbrush.
0 Comments
Your comment will be posted after it is approved.
Leave a Reply. |
Categories
All
Archives
March 2018
AuthorSandra K. Lee is a freelance writer and stay-at-home mom with a 8-year-old princess & a 4-year-old superhero in Middlesex County, New Jersey. |

 RSS Feed
