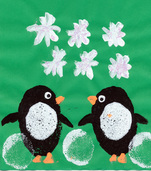
 Items Needed:* Colored paper * White paint * Black paint * Orange paint * Potatoes or cheap sponges * Some paper plates * Paintbrush * A knife or scissors * Glitter (optional) * Hair dryer (optional) This idea came from the The Usborne Big Book of Playtime Activities although we modified it a little bit. 1. You can cut a potato in half to use as a stamp or just cut two sponges to the desired size. We used sponges and cut one large oval and one small oval (adults should do this part). 2. Squeeze some black paint onto a paper plate. Take the larger oval stamp (potato or sponge) and dip it into the paint. 3. Wipe off any excess paint on the side of the plate and then apply the stamp to the paper to create your first penguin. (My 5-year-old could do this with minimal assistance from me but an advanced 4-year-old might be able to do it without much help). 4. Repeat for the second penguin body. 5. Let black paint dry for a few minutes. You can speed this up by using a hair dryer. 6. Put some white paint on a second paper plate. Take the smaller oval stamp and dip it into the white paint and apply it to the middle of the black oval for each penguin's belly. 7. Take the paintbrush and dip it into the white paint and make a circle for each penguin's eye. Clean the brush and then make a black painted circle to make the pupils. (A young child can probably try this although my daughter wanted me to do it for her). 8. Then put the brush in the black paint again and paint the wings. A preschooler could do this. My daughter had me do the first wing, then help her with the second wing and then she did the last two wings by herself. 9. Clean off the brush and apply the orange paint to make the beak and feet. You're basically painting triangle shapes, which my 5-year-old did on her own. 10. Use the smaller oval stamp dipped in white to make the snowballs on the bottom of the picture. 11. Your child can use a finger or the paintbrush dipped in white paint to make the falling snowflakes. Have your child make a "cross" shape and then an "x" shape to make the snowflakes. For a bit of added flair, you can sprinkle some glitter onto the snowflakes while the paint is still wet.
0 Comments
|
Categories
All
Archives
March 2018
AuthorSandra K. Lee is a freelance writer and stay-at-home mom with a 8-year-old princess & a 4-year-old superhero in Middlesex County, New Jersey. |

 RSS Feed
