 Materials Needed
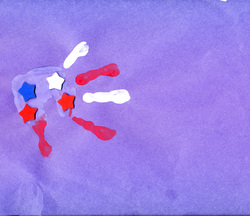
* sheet of construction paper * red, white and blue paint * glue * wooden stick * optional - star stickers 1. Take a sponge or paint brush and apply different colors to your child's fingers and palm 2. Then help your child place their hand on the paper 3. When the paint is dry, apply the stickers and glue the wooden stick to the paper 4. Your flag is now complete and you have a personalized memento. Idea from the Middlesex Borough Recreation Department
0 Comments
Here are some resources that help kids celebrate green! Don't forget to check out our recommended reading.
ParenthoodNJ Crafts - including our Shamrock Mouse DLTK Growing Together - St. Patrick's Day activities including dot-art printables, coloring pages, games and more Enchanted Learning - St. Patrick's Day crafts & activities KinderArt - St. Patrick's day projects including a Shamrock mask and printable coloring pages Craft books: Crafts for St. Patrick's Day by Kathy Ross 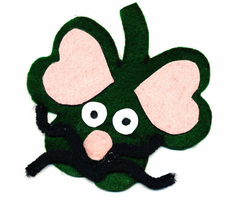 Felt Shamrock Mouse Items Needed: (see below for alternate materials) * piece of green felt * piece of pink felt * pink pom pom * googly eyes or felt or paper eyes * black yarn or pipe cleaner * craft glue * scissors * black marker * magnet (optional) Recommended for preschoolers & older (although adults will need to help with scissors for younger kids) I discovered this craft in Crafts for St. Patrick's Day by Kathy Ross and my 4-year-old and I decided to give it a try. Now, I'm often unprepared for our impromptu craft sessions so there are suggested alternatives to the items needed, depending on what you have and your child's preference. The steps for completing this project are basically the same, regardless of the materials used. First cut out a shamrock shape from your green felt (or paper, see below). If you're like me and can't really draw, you can trace a template from online and use that to cut your shape. Young children will need help cutting this shape, especially if you're using felt. Then draw and cut out the inner ears from the pink felt or paper. These are basically a heart shape. Your child can then glue the inner ears to the shamrock shape and then attach the nose. Whether you use googly eyes or make your own out of felt or paper, your child can glue those next. (Note: the larger eyes look best; we tried smaller ones and the mouse looked a bit shifty). Then glue the whiskers and your St. Patrick's Day Mouse is complete. Alternate Materials: - if you don't have felt, you can do this entire project with paper and yarn. Just use colored paper for the shamrock, eyes, nose and ears and yarn for the whiskers - if you don't have googly eyes, you can make eyes out of white felt or paper; just cut out two circles and then use a black marker to make the pupils - Kathy Ross' book called for yarn for the whiskers but my daughter wanted to use a black pipe cleaner. Just cut it to desired length, bend and glue onto the face - if you don't have a small pom pom you can cut out the nose from a piece of leftover pink felt or paper - you can turn this into a festive magnet by attaching a small magnet to the back This is your new blog post. Click here and start typing, or drag in elements from the top bar.
 Items Needed:
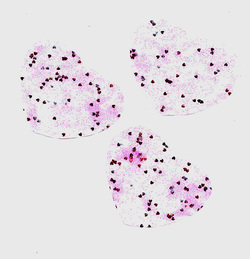
* Heart-shaped cookie cutter (sizes optional) * Piece of white paper * Glitter Glue or glitter paint * Pencil or marker * Scissors (optional) A quick and easy craft for young children. Place the cookie cutter on the paper and draw or help your child to trace the heart. You can draw as many hearts as you want and if you have various sizes of cookie cutters, you can mix and match. If you want to highlight the border of the hearts, use a marker, otherwise use a pencil. Have your child paint the inside of the hearts with the glitter glue or paint. You can: - leave the hearts on the paper and give as a gift or showcase as a Valentine Decoration - cut out the hearts and use them to decorate a Valentine's Day card (you'll need small hearts for this or a larger piece of paper than 8 1/2 by 11 for the card) - cut out the hearts and tape them to a door or window to create some festive decor 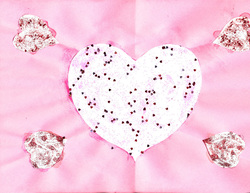 Items Needed:
* A piece of pink or red construction paper * A piece of white copy or construction paper * Glitter Glue or Glitter Paint * Craft Glue * Scissors * Pencil Kids of all ages can do this craft although younger children will need help with the cutting. Fold your colored construction paper in half and draw half a heart. Then cut it out. Fold the paper in other sections and draw and cut smaller hearts. The location of these hearts is up to you. Have or help your child use the craft glue to attach the colored construction paper to the white paper. Then decorate the white sections with glitter paint or glitter glue. You can add sequins for extra dazzle. Don't throw out the hearts you cut out. You can use them: - by placing them loose in a Valentine's Day Card's envelope - you can use them to decorate a Valentine Card 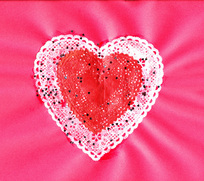 Items Needed:
* Heart-shaped doilies in red and white (color and sizes are optional) * Glitter Glue or Glitter Paint (clear or white glitter paint works best here) * Craft Glue (if you don't use glitter glue) * Red, pink or white construction paper (optional) This is a quick and easy craft for even very young children because they can just slap on the glitter glue and it will still look pretty and sparkly. You can use a piece of red, pink or white construction paper as a background or you can choose to just have the doilies decorated. You can also pick smaller doilies and attach them to a folded piece of construction paper to decorate the cover of a card. To do the craft the way we did, attach the larger doily to the construction paper with craft glue or glitter glue. Note, we used glitter glue for this step and my daughter was very liberal with the glue which is why it looks puckered in the photo. It looks fine but if you want to avoid the puckering use regular craft glue for this step. Then attach the smaller doily to the larger one using glitter glue or use craft glue and then paint it with sparkling paint. There is no "right way" to do this. Let your child spread as little or as much glue or paint as they'd like. If you don't want the craft to get too wet and pucker, try having them decorate the doilies first and then attach them to the construction paper when they're mostly dry. You can vary this craft with different colored doilies and backgrounds, varied glue colors or add sequins. 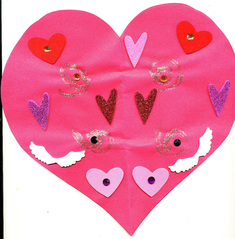 A card or decoration Items Needed: * Construction Paper (pink or red best) * Pencil * Glitter Glue (color is up to you) * Festive stickers * Scissors * Rhinestones (optional) * Crayons or markers (if you decide this is a card) Recommended age: toddlers and older can do this although with very young kids you will need to cut for them and you might want to skip the glitter glue or help apply it. Fold a piece of construction paper in half and draw half a heart shape along the fold. Cut out the heart shape along the line you've drawn. Note: If you'd like to make another craft with the leftover paper, cut out two pieces of paper and click here for more information. Unfold the heart that you've cut out. If your child wants this to be a Valentine's Day card, have them decorate and write on the inside first. When done with the inside, or if you simply want this to be a decoration, adorn the front of the heart with stickers and glitter glue. If you have rhinestones, you can place them on your heart stickers or in a variety of ways. We swirled the glitter glue on the paper but you can choose what design you'd prefer. To swirl the glitter glue, apply a small blob onto the paper and then use the tip of the applicator to "draw" the shape. When the glitter runs out, apply another blob to the end and then spread it out again. Continue until your shape is finished. A preschooler can do this with some parental guidance, depending on the shape. If you use a lot of glitter glue it can kind of warp the paper so you can either use a thicker paper or take the second cut-out heart (if you had cut a second heart) and glue it to the decorated heart.  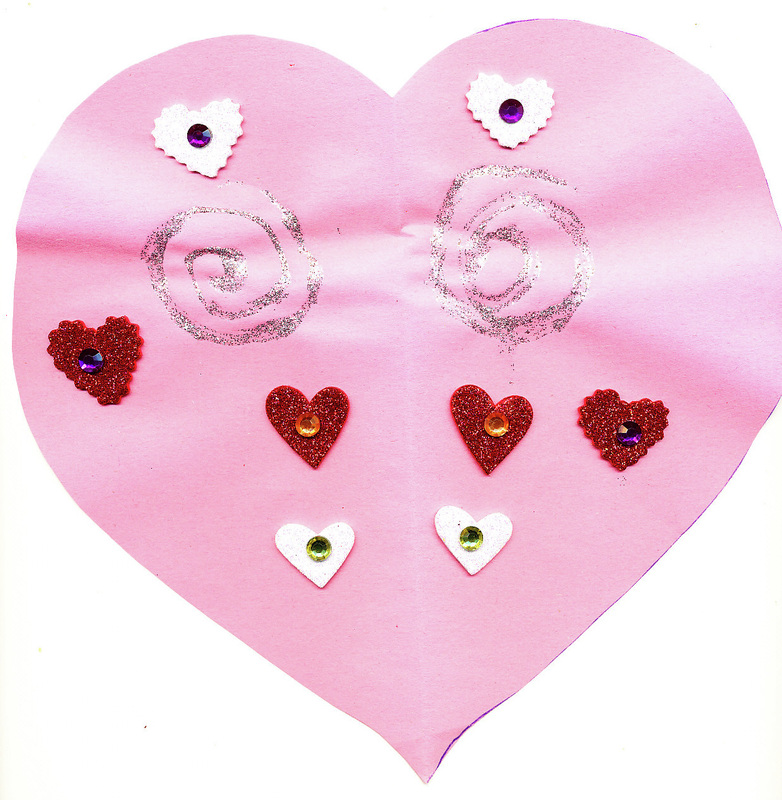 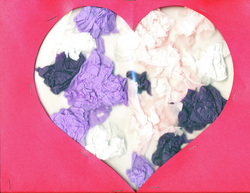 Items Needed: *Two pieces of construction paper (pink or red ideal for Valentines Day but color is your choice) * Tissue paper (more crumpled the better; colors optional) * Laminating pouches (or something similar) * Glue Stick * Scissors * Pencil * Stapler * Tape or stickers (optional) Age recommended: ideal for 4 years and older but some 3-year-olds could do with extra help If you're like me you might just be getting around to putting away your Christmas decorations and miscellaneous related items such as leftover gift wrapping. Well, I have a use for any crumpled tissue paper you might be thinking of tossing as you pack things away. Take your two pieces of construction paper and place one on top of the other. Then fold them in half. Draw half a heart on the folded paper (parents would need to help younger kids), starting at the top of the fold and curving to the bottom (see first of the photos below). Be sure to leave a little space at the top and bottom of the heart. Use your scissors to cut along the heart you've drawn (parents need to do this for younger children; see second photo below). Set aside the cut-out hearts. You can use them for another craft. Tear up and crumple your tissue paper. Your kids will love this part. If you haven't done so already, open your paper to reveal your full heart. Place a laminating pouch on top of the heart (so you can see the heart shape through the plastic) and lift the top of the pouch (like opening a book). Use the glue stick to glue a section of the pouch within the heart shape and then put the tissue paper on it. Continue until the area of the heart is as filled as you want it to be. Then place the top of the pouch over the tissue paper - your tissue paper is now sandwiched between both plastic pieces of the pouch. Place a heavy book or two (or three) on top of the laminating pouch to flatten the tissue paper as much as possible. If you have really crumpled tissue paper, it shouldn't take much to flatten it. If your tissue paper is in better shape, it might take a few hours to really pack it down. Once the paper is as flat as you'd like it, remove the books and now place the laminating pouch (filled with tissue paper) between the two pieces of construction paper. Use your stapler to attach all the pieces (parent should help younger children). If you don't want to use staples, you can use tape but staples really do hold it together better, especially near the cut out of the heart. If you don't like the look of the staples, your child can place decorative stickers over them. Now you have a great holiday decoration or gift for Mom or Dad or a grandparent! Draw and cut your heart on your construction paper. Remember to cut both pieces of paper at the same time so your hearts are the same size 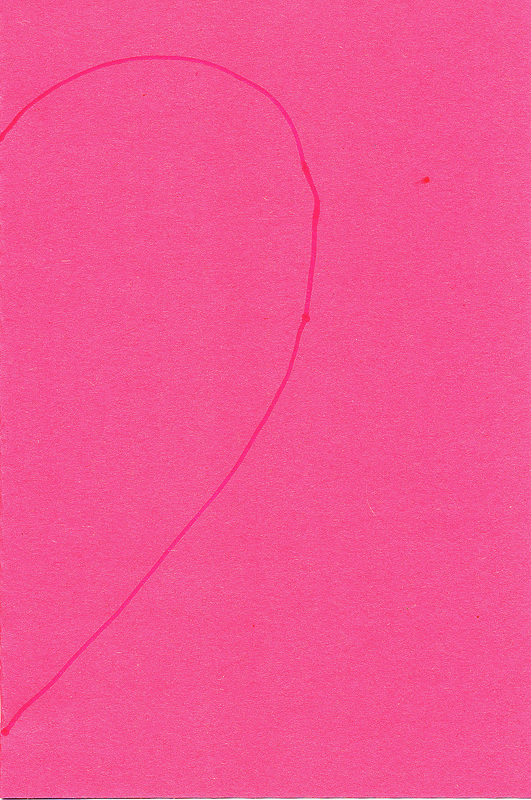 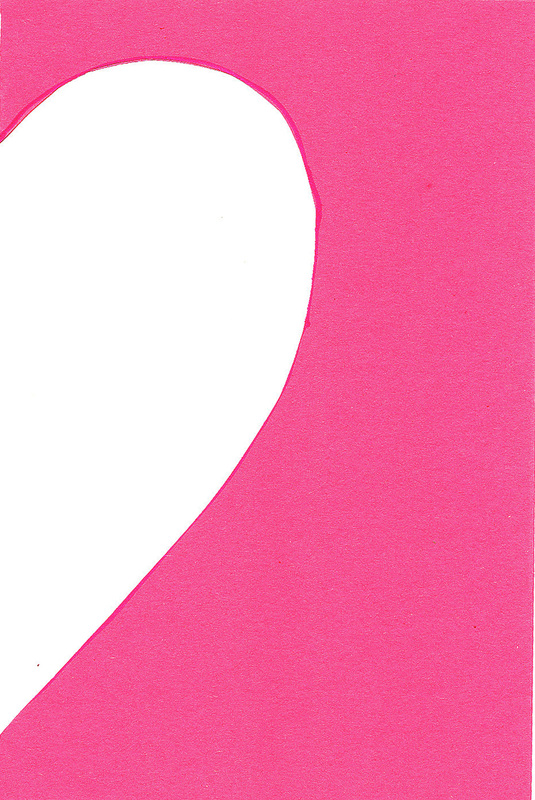 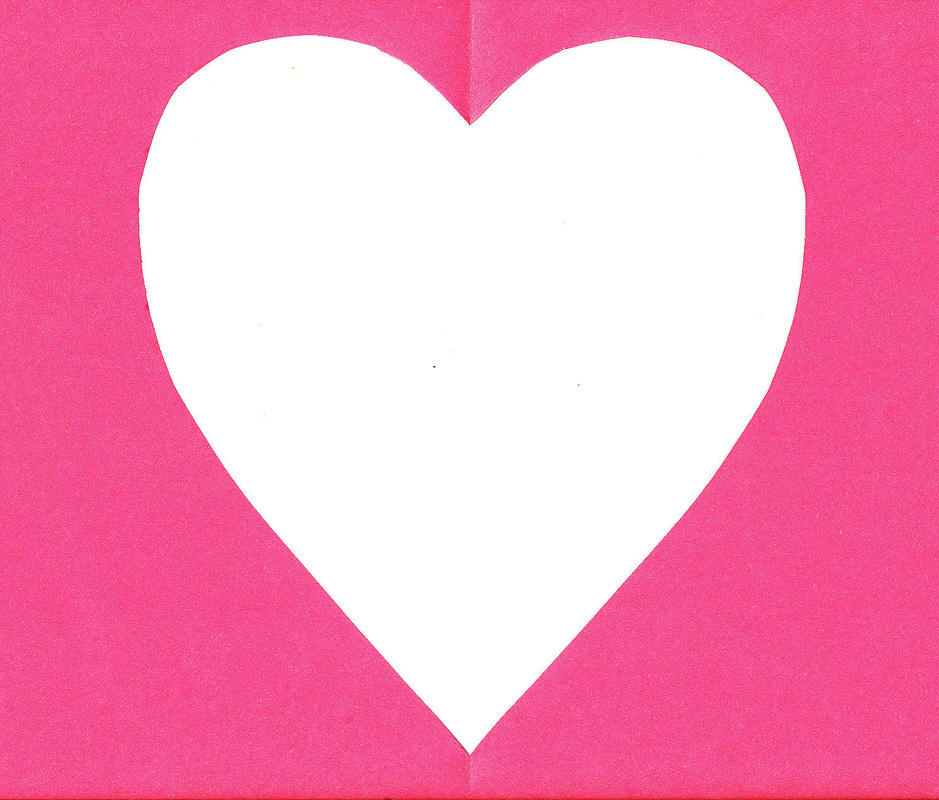 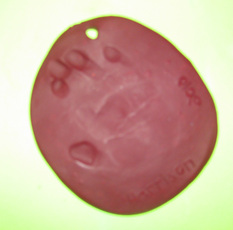 Items Needed* Clay that can be baked (color optional; amount depends on the size of the hand) - note alternate materials below
* Baking pan * Tin foil * Clay knife or similar utensil * Rolling pin for clay * Depending on your child's age, an additional adult can be helpful * Ribbon if you want it to be an ornament * Access to an oven It's not terribly expensive to buy a hand print ornament kit (the average price is $10), but you can do it for a fraction of the cost on your own, especially if you want to make more than one. In addition to making a hand print ornament as a gift for the grandparents (great for your baby's first Christmas) you can make your own hand print keepsakes inexpensively as your child grows. Knead the clay and then roll it out onto your pan. I've done this several times so I actually have an old baking pan I use specifically for baking clay items. If you don't have a pan like that, then line it with tin foil and place your clay to be baked on top of that. Roll the clay out to about 1/4 inch thick or so. You can make it a little thicker if in doubt. Roll out enough to have space around your child's hand. Sometimes if you flip it over the underside is smoother looking. Then have your child place - or help them place - their hand roughly in the center of the clay and push down. If the child is 3 or younger, you'll want to try and hold their hand down for a few seconds and gently push each digit into the clay just to be sure you get a full impression (of course your child's age, squirm factor and general attitude will play a large part). Then try to pull your child's hand straight out (note some younger kids will instinctively curl their fingers so pulling the hand back quickly helps avoid this). If you don't like the impression, pull it off the pan, roll it into a ball and re-roll it for another try. If you do like it, then cut away any excess clay with the knife to make it a circular or oval shape. You can also use a clay tool or even a push pin to carve your child's name and/or the year. Also use the knife or clay tool to cut a small hole in the top for your ribbon later. Cook it in your oven to the temp and time frame recommended on the clay package. Once it's cooled, tie your ribbon. For an extra creative boost, wrap your gift in hand print paper. Other tips and ideas: * If you want to have keepsakes of your child's growth, buy the air-dry or baking clay in different colors and you can do their hand and foot prints at different milestones - 3 months, 6 months, 9 months, 1 year and so on. At the two-year mark, I did my daughter's hand impression for that milestone, 2 1/2 and 3 years and then switched to paint hand prints as they're easier to store. * If you use the air-dry or baking clay in colors instead of plain white, then buy at least two packs per color. I liked using a different color for each milestone (ie blue for 3 months, then green for 6 months) and as your child grows, you will need at least 2 packets (if that's how you buy the clay) for one hand or foot. You can buy white in a big box but be sure to put the excess in a zip lock bag or it could dry out before you're ready to use it again. * You can get a shadow box to display the prints or just keep them in a nice decorative box. You can also mount them on a wall or place on a decorative shelf. 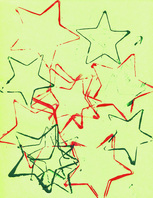 Cookie cutters for creative designs Items Needed * Cookie cutters (can use one or several) * Paint (variety of colors optional) * Tray or paper plate for each color * Paper This craft was initially done by my 4-year-old daughter for Veteran's Day through the Middlesex Recreation's Pre-K Art Program. At that time, they used red and blue paint and stars but I thought this could easily be adapted for Christmas or as a general craft. The image of the stars was done on green paper and we used green and red acrylic paint. I poured the paint into separate plates and she dipped the cookie cutter star into the paint and then applied it on the page. She did a few different ones, experimenting with different shapes and overall designs. For the last piece, she dipped the cookie cutter into one paint color and then the next and then a third paint color before applying it to the paper. The effect was kind of neat. Personally, I think the star and tree shapes worked the best, especially when she tried overlapping them but it's really whatever your child enjoys. This can be a fairly quick and easy craft for you child to enjoy the holidays or for any occasion (depending on your choice of cookie cutters) and can even be a gift or stocking for Mommy or Daddy or grandparents. Below you'll see two more options. On the left we used a white background and my daughter chose a tree cookie cutter in red and green. On the right is a green paper background and she used multiple shapes and mixed the colors. The angel and snowman look "thicker." She actually meant to do that; she placed the shape on the paper and held it there and then gently pushed it along the paper about a centimeter to create a kind of shadow effect. Sometimes it looked cool and other times it looked like a mistake. An older child might have more patience  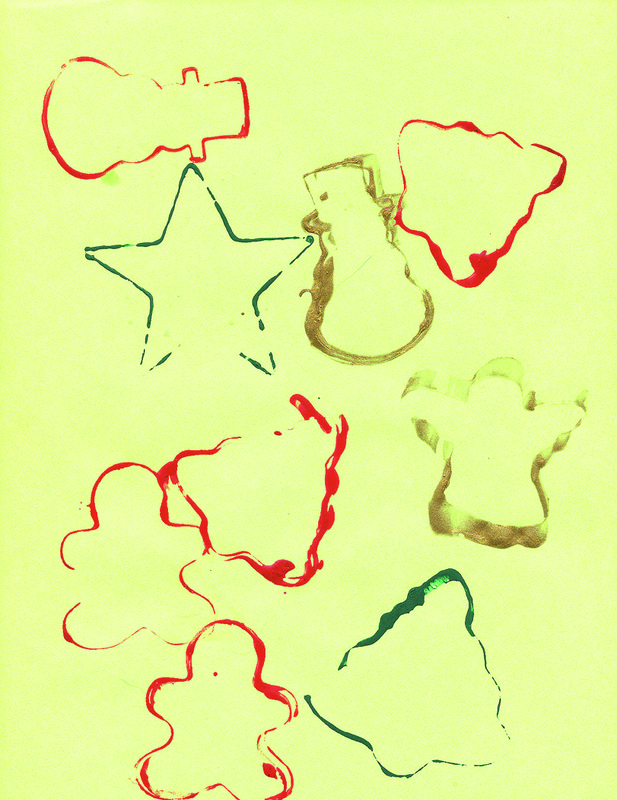 |
Categories
All
Archives
March 2018
AuthorSandra K. Lee is a freelance writer and stay-at-home mom with a 8-year-old princess & a 4-year-old superhero in Middlesex County, New Jersey.
|

 RSS Feed
