 Items Needed:
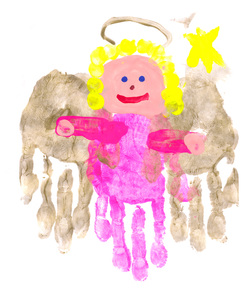
* Piece of paper or card stock (white is best) - you might need a few pieces * Craft paint (gold for wings and halo, other colors optional) * Sponges (get a bunch from a Dollar Store) * Paper Plates * Paintbrush * A few disposable rags or lots of paper towels Note: I did this craft with my 5-year-old which I think is the ideal minimum age. If you try this with a younger child, I would recommend at least two adults help with this craft. This craft, based on a project in The Usborne Big Book of Playtime Activities, can be messy and a little time consuming but it is worth the effort and makes a great keepsake. 1. Start with the "body" of the angel and apply your paint color to a paper plate. My daughter chose pink. 2. Rub the sponge on the plate and wipe off some excess and then place your child's hand on the sponge to apply the paint to his or her hand (this is like having a large ink pad). 3. Firmly place your child's painted hand in the center of the paper. If you don't get it right the first time, try again with a new piece. 4. Let the "body" dry for a few minutes; take this time to wipe off the excess paint. (Note: You could do the wings first to prevent multiple hand cleanings, but you'd have to be pretty certain of your hand placements). 5. Assuming you've done the body hand print first, now apply your gold paint to another plate. Spread a sponge on the gold paint (You could use the other side of the first sponge but you will get very messy. For a cleaner option, rinse the first sponge or just use a new sponge for this color). 6. Press your child's hand onto the gold-painted sponge. Wipe off any excess and firmly apply the hand to the paper, slightly overlapping your "body" hand print. 7. Then apply your child's other hand to the gold-painted sponge (you may need to add some paint to the sponge). Press this hand to the other side of the "body." 8. Allow the paint to dry a little and wipe your child's hands off. 9. Rotate the paper so the fingers are pointed down. 10. Use a pale pink or cream paint (or whatever skin tone you'd prefer) and have your child finger paint a circle for the head and two finger prints for the hands. For younger kids, you can help guide them. 11. Dip your child's finger in whatever paint color you've chosen for the hair color and apply the hair around the head in a dot pattern. 12. Draw a face with your choice of colors for the eyes, nose and mouth. (A paintbrush might be best here and an adult might be needed for this part). 12. Use the gold paint and draw a halo. Small kids can use their finger or a paintbrush. 13. You can embellish the picture with other decorations such as stars which can be drawn with the finger or a paintbrush.
0 Comments
 Items Needed:
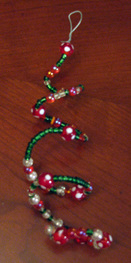
* Assortment of beads * Piece of wire * Wire cutters Note: If you have beads with wider holes, you can use a pipe cleaner instead of the wire. 1. Thread the first bead on and wrap the wire around that bead to create a "stop" so the beads won't fall off. 2. Thread the other beads onto the wire in whatever pattern you desire. 3. When you have enough beads, twist the wire into a curved shape. 4. Bend the wire into a loop and cut any excess wire (an adult should cut the wire). Hang from your tree, mantel or anywhere in your house. 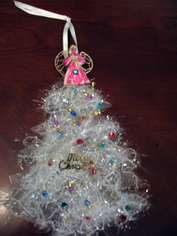 Items Needed: * Piece of clear or white plastic * Piece of white garland material * Decorative garland (the kind for miniature trees) * A miniature ornament for tree topper (we used an angel) * Pencil or marker * Piece of ribbon * Scissors * Glue * Suction cup hook (optional) Note: You can use a piece of card stock or cardboard instead of plastic to back your tree. We used plastic so the sun would shine through the tree for a sun catcher effect. 1. Draw a tree shape on your plastic or card stock. (Use a stencil if necessary). 2. Glue the white garland to the tree shape. 3. Wrap the decorative garland around the tree. Glue the ends to the back of the tree. 4. Attach the tree topper to the tree and glue it. 5. Tie the ribbon around the tree topper. 6. If this will be a sun catcher or window ornament, This is your new blog post. Click here and start typing, or drag in elements from the top bar.
 Items Needed:
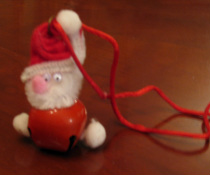
* A Jingle Bell (red color ideal) * 4 white medium pom poms * 1 small pink pom pom * pair of googly eyes * red piece of felt * 1 white pipe cleaner * small ring and piece of string * craft glue; hot glue gun is best * scissors Note: if using a hot glue gun, parental supervision - and parental involvement depending on the child's age- is required. 1. Glue one white pom pom to the top of the jingle bell. 2. Glue the other two pom poms to the bottom for his feet. 3. Cut the piece of felt into two triangles. Glue them to each other and attach to the pom pom head. 4. Once the glue has dried enough, bend the white pipe cleaner around the head and hat to make the hat's fur trim and Santa's beard. Cut the pipe cleaner if needed. 5. Glue on the pink nose and eyes. 6. Glue the top of the hat to one bottom corner of the hat and put the metal ring around the hat. 7. Thread the string through the hole and tie in a knot. Your Jingle Bell Santa is now read to be hung from your tree or elsewhere or it can be worn as a festive necklace.  When you're not Trick-or-Treating, reading Halloween books or enjoying other Spooky events during this Halloween weekend, check out ParenthoodNJ's craft ideas and Halloween crafts on the following sites:
Education.com - free printable coloring pages, craft ideas & more Celebrate Halloween - Nick Jr offers ways to make your own costume & decorations, tasty treats & Halloween coloring cards DLTK's Growing Together - another great site for free printables and craft ideas 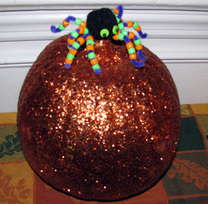 The perfect accessory to a pumpkin Materials Needed: * Large Black Pom Pom ball * Several beads of different colors * Googly eyes or eye stickers * Pipe cleaners * Hot glue strongly suggested (parental supervision required) but craft glue could work Learn to make this cute, not creepy, spider for Halloween. We discovered this craft at the Miller-Cory House Museum. 1. Glue the pipe cleaners to the bottom of the pom pom ball. Let the glue dry completely. (Parents might want to do this step beforehand so kids don't have to wait; also a good idea if using a hot glue gun). 2. Use glue (craft glue is sufficient) to apply googly eyes or attach foam eye stickers. 3. String the beads along the pipe cleaners. Bend the bottom of each pipe cleaner so the beads don't fall off. Find the perfect spot for your crafty critter. 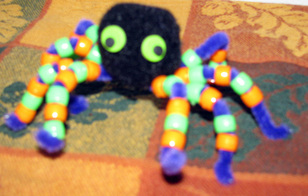
This little guy is more cute than creepy
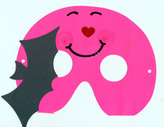 Materials Needed:
* Paper mask (or card stock paper & scissors) * Popsicle stick or similar * Face stickers * Markers or crayons (optional) * Glue * Cut out designs such as a bat * Feathers, glitter or other decor (optional) This craft can be as simple or elaborate as you and your kids want to make it. 1. If you haven't bought a paper mask, then cut a mask out of your card stock paper. 2. Let your child apply "face" stickers to make a cute face on the mask or let them draw a face. 3. 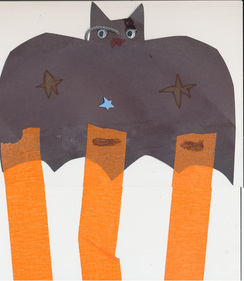 Materials Needed:
* Black construction paper * Googly Eyes * Glue * Scissors * Piece of yarn * Crayons or Markers * Party streamers (color optional) * Stickers (optional) This idea came from the Middlesex Borough Library and is a great way to get in the festive mood. 1. Draw a bat on the black construction paper (parents will need to do this for younger children). Use a template if desired. 2. Cut out the bat shape. 3. Let your child decorate the bat with markers or crayons. Stickers can be added if desired. 4. Glue on the eyes. 5. If you want, glue on as many streamers as desired. 6. Cut a small hole in the top of the bat and attach the yarn. Then hang and enjoy! 5. 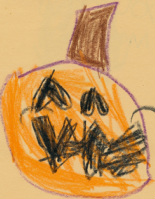 Materials needed:
* card stock, colored or construction paper * crayons or makers * photo of your child in Halloween costume * scissors & glue (optional) * stickers (optional) What better way to share the Halloween holiday with distant loved ones than a special card? Younger children might need a little help but let your child decide what the design will be. Use crayons or markers to create a Halloween scene and embellish with stickers or pasted pictures, if desired. For an extra special card, include a photo of your child in Halloween attire. 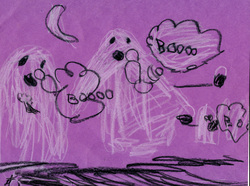 Materials needed:
* colored paper * crayons (or markers if preferred) It's such a simple idea but sometimes those are overlooked. Just get some paper and encourage your child to draw a Halloween scene. And then you can decorate your child's room or part of the house for Halloween with |
Categories
All
Archives
March 2018
AuthorSandra K. Lee is a freelance writer and stay-at-home mom with a 8-year-old princess & a 4-year-old superhero in Middlesex County, New Jersey.
|

 RSS Feed
