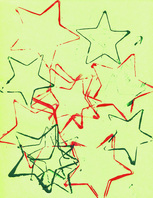
 Cookie cutters for creative designs Items Needed * Cookie cutters (can use one or several) * Paint (variety of colors optional) * Tray or paper plate for each color * Paper This craft was initially done by my 4-year-old daughter for Veteran's Day through the Middlesex Recreation's Pre-K Art Program. At that time, they used red and blue paint and stars but I thought this could easily be adapted for Christmas or as a general craft. The image of the stars was done on green paper and we used green and red acrylic paint. I poured the paint into separate plates and she dipped the cookie cutter star into the paint and then applied it on the page. She did a few different ones, experimenting with different shapes and overall designs. For the last piece, she dipped the cookie cutter into one paint color and then the next and then a third paint color before applying it to the paper. The effect was kind of neat. Personally, I think the star and tree shapes worked the best, especially when she tried overlapping them but it's really whatever your child enjoys. This can be a fairly quick and easy craft for you child to enjoy the holidays or for any occasion (depending on your choice of cookie cutters) and can even be a gift or stocking for Mommy or Daddy or grandparents. Below you'll see two more options. On the left we used a white background and my daughter chose a tree cookie cutter in red and green. On the right is a green paper background and she used multiple shapes and mixed the colors. The angel and snowman look "thicker." She actually meant to do that; she placed the shape on the paper and held it there and then gently pushed it along the paper about a centimeter to create a kind of shadow effect. Sometimes it looked cool and other times it looked like a mistake. An older child might have more patience  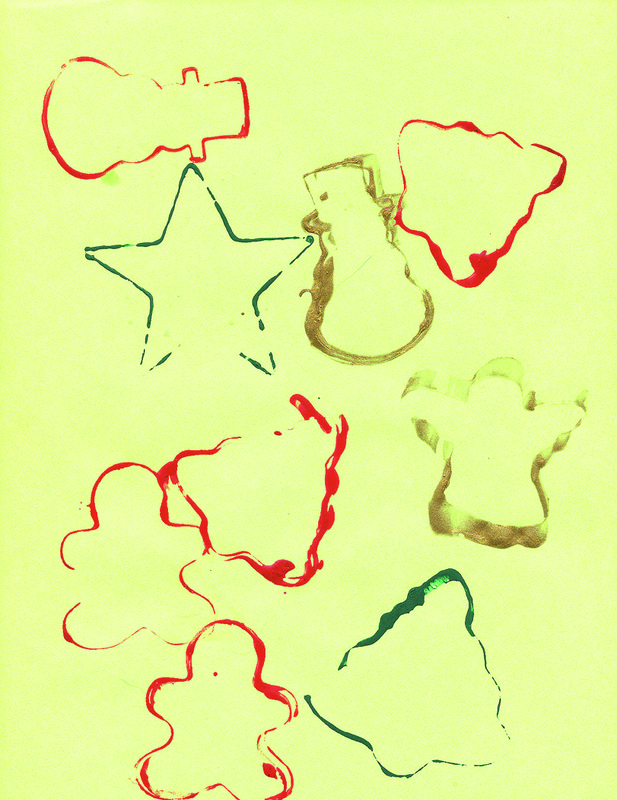
0 Comments
 Creative Gift Wrap Items Needed
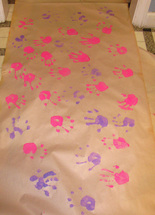
* Paint - as many colors as you want * Brown or white craft paper (large or on a roll) * Paper plate or tin * Cheap sponges (optional but recommended) I read about this idea of using a child's hand prints to make unique wrapping paper years ago and finally got around to trying it with my 4-year-old daughter. Depending on how busy your holidays will be and how far behind you are - and how patient you and your child are - you might want to try this for a few key gifts or attempt it for another occasion. But we were brave and had some time, so my daughter and I tried it. I took a big roll of the craft paper and rolled it out onto the kitchen floor. You can do Christmas colors if you want but my daughter loves pink and purple so that's what we did. I took pink paint and poured it into a paper plate and then took a cheap sponge and dipped it into the paint and wiped off the excess. Then my daughter placed her hand on the wet sponge before placing it on the paper. You can have your child dip their hand directly into the paint but I find that this means more paint on the hands and potentially sloppier prints. She did pink all around the paper with one hand and then we washed her hand. Then I poured purple paint onto another plate and used another sponge. Then my daughter used her other hand and repeated the process. I don't know whether it was the type of paint (the pink was tempera and the purple was acrylic) or she got lazier over time but I thought the pink hand prints came out better. If it was the paint, then you might want to try tempera. This is a messy craft, but fun. Also, find a place you can easily clean whether it's putting a tarp down or using a linoleum floor like ours. I also recommend you and your child wear old clothes or depending on the child's age, have them wear only a diaper or underwear to minimize clothes clean up. You also can do foot prints as a change of pace and if you have multiple children this is a neat way to showcase the different sizes. I think this is a creative and unique way to wrap gifts, especially for grandparents, which is how we plan to use the paper. And they can even save some of the paper if they want. If your child is really young and you want to do this, I'd recommend taking one hand print impression (and an ink pad might be better) and scanning it into your computer. Then just copy and paste it in a word document and print. This method would work best with smaller gifts. 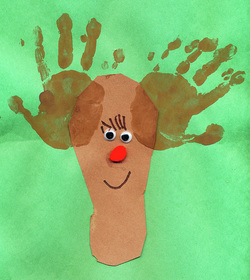 Items Needed:
* Two pieces of construction or copy paper of different colors. One should be brown. The other, for the background, can be any color * Paint - brown was used here but any color is fine * One small pom pom * Craft glue . * Paper plate or tray (sponge optional) * Googly eyes * Black marker * A pencil * Scissors This gift was made by my preschooler at the Middlesex Recreation Department's Pre-K art class for the Christmas holiday and I think this would make a great keepsake gift for the grandparents or other relatives. You could probably do this with an older toddler but it could take a few tries to get the hands right. Take your brown piece of paper and have your child place his foot on it and use your pencil to trace around it. Cut out the traced foot (an older child can do this; otherwise the parent should). Glue the foot tracing to the background paper. Put paint on your paper plate or tray. You can have your child place their hand directly into the paint or use the sponge, which I think is easier. You can use the sponge one of two ways: dip the sponge into the paint, wiping off the excess, and have your child firmly press their hand into the sponge or use the sponge to wipe the paint onto their hands. Once the paint is on their hands, help them place each hand on the paper to make the antlers. I strongly recommend you do one hand at a time. You can do the facial features before the antlers so your last step is clean up, but I think the hand placement could determine where the eyes, etc go so I chose to do it first. If you do the hands first, you'll want to take a minute to clean their hands and then glue the eyes and the nose. Depending on the age of the child, they can draw eyelashes and a smile or the parent can do it. Sign your artist's name (or they can do it) and you have a wonderful crafty holiday gift. 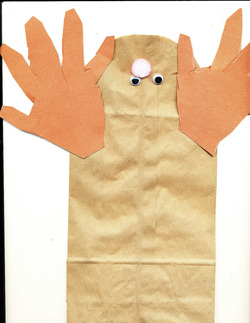 Items Needed
* Brown paper lunch bag * Brown construction paper * A medium pom pom * Googly eyes * Scissors * Pen or pencil * Craft Glue Optional: Oatmeal, glitter and plastic sandwich bag for "reindeer food" A very easy holiday craft to do with your child and it can also be a keepsake or gift bag. Cut the open end of the lunch bag so that it is rounded. Use your pen or pencil to trace your child's hands on the construction paper and then cut them out. Glue the hands to your bag to make the antlers. Then glue the eyes and the nose. You can choose any color pom pom for the nose; my daughter chose pink because it's her favorite color. You can use the bag as a special gift bag, perhaps for your child to give to a friend or family member. As an option, you and your child can make the reindeer food by mixing oatmeal and glitter together in a sandwich bag and then keep it in your reindeer bag until Christmas Eve. Then sprinkle the reindeer food on your lawn on Christmas Eve night. 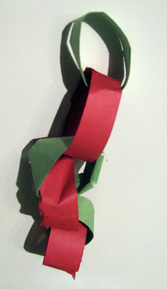 Items Needed * Construction paper - at least two different colors * Scissors or paper cutter * Tape or Glue stick * Pen & ruler (optional) This is a fairly easy craft to do with your child of almost any age and an inexpensive way to count the days until Christmas. If you have a paper cutter, the adult can cut the construction paper into strips. If you don't, then you can use a pen and ruler to draw lines to create the strips that need to be cut. Or you can simply cut the paper into strips by "eye-balling" it. The strips we made were roughly a half inch wide and about 3 inches or so long. We chose red and green for Christmas but you can use other colors or add another color. Once the strips are cut, your child loops one together to make a ring and then use glue or tape to hold it together. Then take a strip of the other color and make a ring and attach it to the first ring. Keep going until you get to 25. We hung our chain from a doorknob but you can hang it over the fireplace, from your Christmas tree or whatever place you choose. On December 1, your child just tears off the first ring and each day they do this until the final ring on Christmas Day. It's such a simple thing but my 4-year-old daughter has been so excited to take the ring off each day. This is your new blog post. Click here and start typing, or drag in elements from the top bar.
  Items Needed:
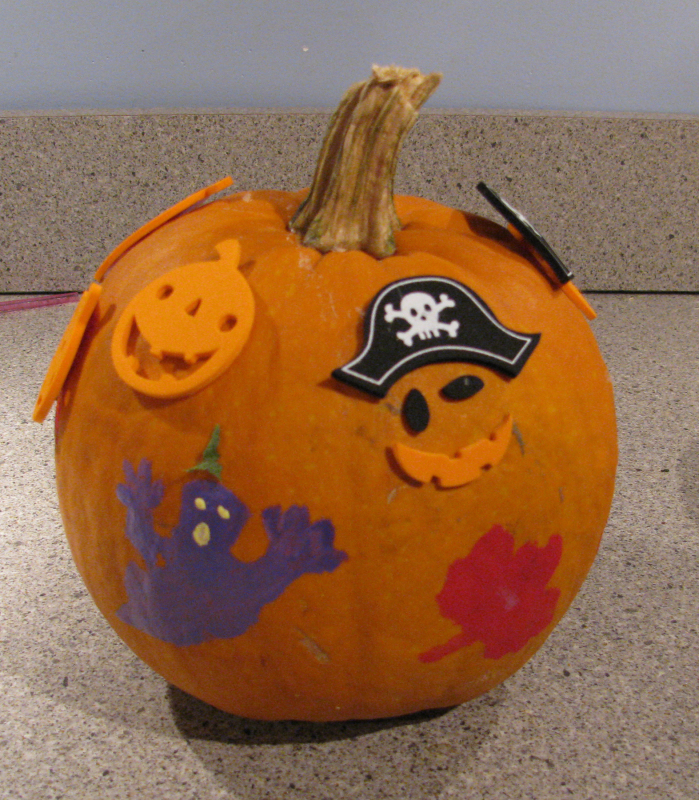
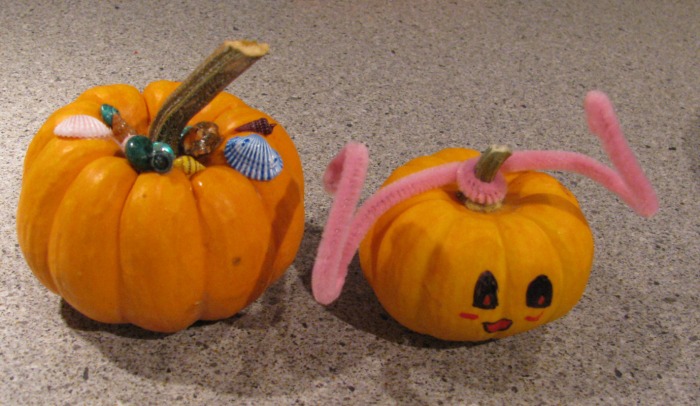
* Pumpkin * Halloween Stickers * Paint or Markers * Stencils * Pipe cleaners or ribbon (optional) * Glue and shells (or other decorative elements) (NOTE: the nature of this craft makes it better as an indoor than an outdoor pumpkin, the exception being if you only paint the pumpkin.) If you have a young child, carving a pumpkin for Halloween may not be your ideal craft project so here are some ideas for the younger set to get into the Halloween spirit. If you have stencils or want to buy them, you can find ones with Halloween shapes. This is really better for an older child of at least 5 or 6 or you can be like me and paint it for your child. You also can just let your younger child "paint" the pumpkin however they like. It likely won't be display-worthy, but your child will have fun painting it. The other option for a toddler or preschooler is to have them put stickers on the pumpkin. We got these great Halloween foam stickers from Michaels that allowed you to put masks on the foam stickers. You could also use glow-in-the-dark stickers. You also can use markers or paints to draw faces on your pumpkins as we did with one of the smaller pumpkins pictured. My daughter decided her pumpkin should have arms so we just twisted a pipe cleaner to the stem. A painted pumpkin should stand up to being outside; you could also spray seal it (outside) for added protection. And the last project is really up to what you have and the imagination of your child. We had some colored shells so we glued them to the pumpkin but you could use gems or sprinkle glitter to make unique designs. One thing you should know is that some things were too heavy to stay glued to the sides of the pumpkins so you'd need to hold them longer (not ideal when helping young children) or glue them to the top as we did or use flatter and lighter things to decorate the pumpkin's sides. Any or all of these crafts are quick, easy and fun for all ages an 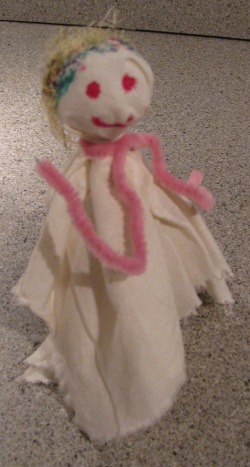 Easy craft that your child will enjoy after the craft is done Items needed: * Pipe cleaner * Piece of cloth or felt * A ribbon * Markers * Foam ball * Glue and yarn (optional: if you decide to add "hair") This is a quick an easy Halloween craft that was inspired by crafts offered at the historic Kennedy-Martin-Stelle Farmstead as part of the Somerset County Weekend Journey Through the Past. Children of all ages will like this craft and if your child is like mine, he or she will play with it after the craft is completed. It's also a great way to get rid of any fabric remnants you might have lying around. Cut a piece of cloth in a large rectangle. The exact size depends on how long you want the ghost's "train" to be. Place the cloth over the foam ball and tie the ribbon in a knot around it. The ribbon will hold the fabric on the ball; you also can use some glue to keep the fabric in place. You can cut the ribbon so it won't be seen or let it trail as a decoration. Take a pipe cleaner and twist it around the ghost's neck and then bend to make arms. Draw a face with markers (or help your child). Kids can draw or glue hair. My daughter actually drew hair and then decided to glue corn silk onto its head. Your child also can decorate the ghost's train if they want. This is your new blog post. Click here and start typing, or drag in elements from the top bar.
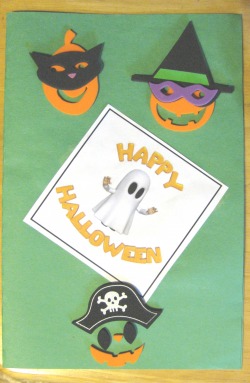 Simple craft makes a great gift for family Items needed: * Sheet of construction paper * Stickers (craft stores have great varieties) * Digital Camera * Computer and printer * Photo paper or nice card stock * Crayons, markers (optional) * Glue * Clip art (optional) This is an easy craft for all ages and makes a great Halloween gift for the grandparents. Take a sheet of construction paper (color of your choice) and fold it in half to make the card - the orientation is up to you. Take a photo of your child in costume and then print on photo paper (you can also order prints if that's easier). Let your child place stickers and clip art on the cover of the card. Craft stores such as Michaels have great foam stickers like the ones we used, which let the kids be a little more creative. But any Halloween stickers will be fine. You can find lots of free clip art on the internet and print it out, cut and paste. An older child can use crayons or markers to write "Happy Halloween" or draw pumpkins or other decorations. Glue the photo on the inside of the card and your child can decorate the rest of the inside with drawings or stickers. Let the glue dry and then it's ready to be delivered! This is your new blog post. Click here and start typing, or drag in elements from the top bar.
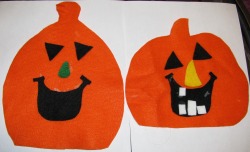 Easy Halloween craft for small kids Items needed: * Orange Felt * Black Felt * White and green or yellow felt (optional - can always skip the teeth and make nose black) * Glue * Scissors * Card stock template for pumpkin shape, his mouth and nose - see links below (can use a file folder instead of card stock; if you can draw or cut freehand, the template isn't needed) Note: if you're doing this project with a younger child, you might want to have all the felt pieces cut and ready to go. If you decide to use the template, cut out the template first and then attach it to the felt and cut around it. (You can hold the template onto the felt with your hand or pin or tape it to the felt). If you don't need the template, draw a pumpkin onto the orange felt and cut it out. Cut triangles for the eyes (can do so for the nose as well) on the black felt. If you are a little more artistic, you can make the eyes round or oval. Draw the mouth on the black felt and cut it out. If you want to make teeth, simply cut rectangles of varying sizes out of the white felt. Now your child can glue the features to the pumpkin and add teeth to the mouth if they choose. If you have a felt board, you can attach a small piece of velcro to attach the pumpkin.
Materials needed: * card stock paper * colored paper * template (or use mine below) * scissors * crayons or markers * craft glue * stickers or glitter (optional) This craft was inspired by The Paper Princess by Elisa Kleven. You can see the finished product below the templates. This is a great, simple craft to do with your princess. You could also modify the figure for a boy. Draw an outline of a princess (to make a fairy simply add wings) on your card stock paper. You can use my template (see below) or search online for something to print and trace over (searching for princess silhouette gives some decent results). If you're drawing your own princess, don't worry if you make mistakes. Once you've drawn the outline, cut it out. This card stock princess will be your template if you ever want to do this project again. Place the template on a sheet of paper (it can be white or colored, depending on how your child wants to decorate it). Trace around your template on the new sheet of paper. Then cut it out. Let your child decorate the princess however she wants. When your child is done decorating, glue the paper princess to a new sheet of paper in a color of your choice. Once the glue dries, you can proudly display. Templates below: These are my crude attempts to draw paper princess templates. The one on the right is my version of Elisa Klevin's Paper Princess. You also can draw your own or find others online. If you use my template on the left, just be careful not to cut off her head when cutting her out; her neck is a little thin! 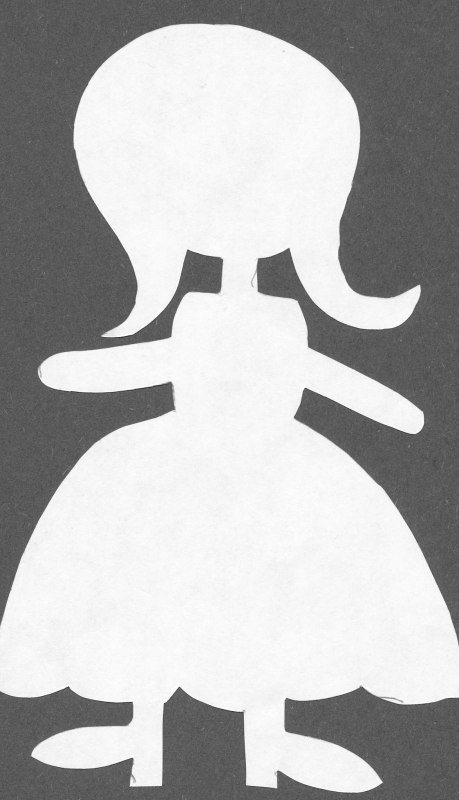 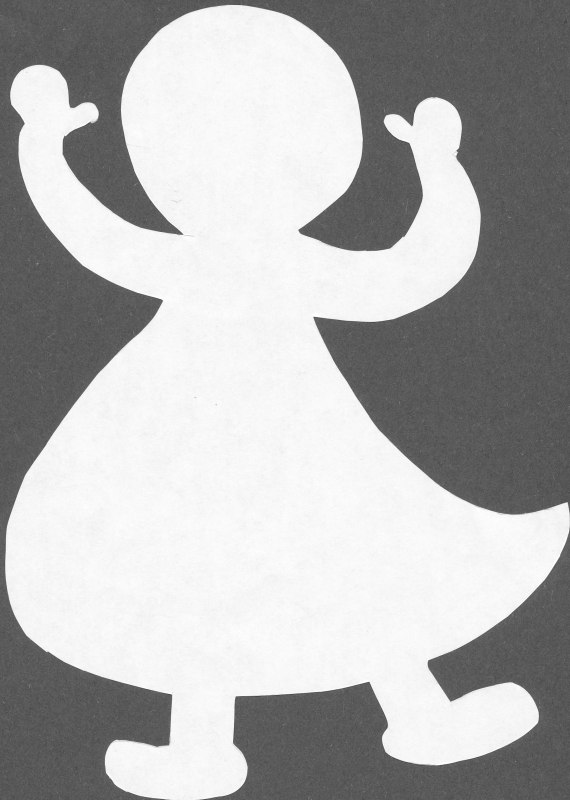 The finished versions done by my 3 1/2 year old. After coloring and gluing she decided she wanted to add stickers.  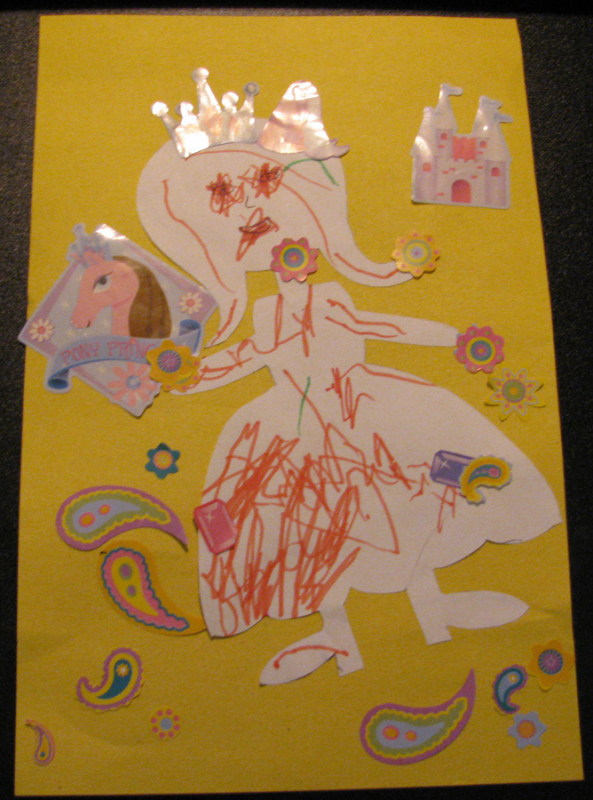 |
Categories
All
Archives
March 2018
AuthorSandra K. Lee is a freelance writer and stay-at-home mom with a 8-year-old princess & a 4-year-old superhero in Middlesex County, New Jersey.
|
||||||

 RSS Feed
